
Looking to get started recording electric guitar? If you own a Mac, GarageBand is a great place to hone your chops. It’s easy to use and has plenty of built-in features and functionality. It also helps that it’s available completely free!
I’ve been recording guitars for well over 20 years, from my home studio with a laptop and audio interface to running fully cranked tube amps through microphones costing many thousands of dollars into a priceless late 70s Neve desk. Great results are very achievable with either method.
This step-by-step guide is aimed at complete beginners who want to start recording their guitar with a Mac and GarageBand. Follow along, and you’ll be making your first songs in no time!
Latest Videos FromGuitar World
What you need
Before you get started recording, you’ll need the following items:
1. Create project
Assuming your audio interface is plugged into your Mac and ready to go, here’s what you need to do to start recording your guitar with GarageBand.
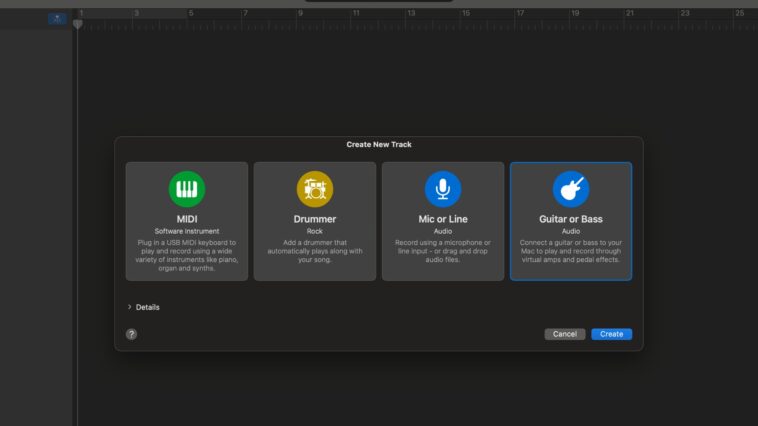
Your first step is to create a project. Find GarageBand in your Applications folder and load it up.
Choose an empty project, then when the next window pops up, hit ‘Guitar or Bass’.
2. Check audio/MIDI settings

Before you do any recording, we’ll need to check your audio and MIDI settings. Go to GarageBand in the top-left corner and click ‘Settings…’.
Next, go to the Audio/MIDI tab. We want to check the Output and Input Device menus.

Select your audio interface; in my example, it’s the ‘Universal Audio Thunderbolt’. If you don’t see your interface listed, head to the troubleshooting section of the guide.
3. Input monitoring

First things first, and this is something that catches a lot of people out. We need to ‘monitor’ the sound in GarageBand. There are two ways to do this.
The easiest is by clicking the button next to ‘Monitoring’. It’s in the window to the left of the guitar amp settings. In the image above, you’ll note it glows orange once clicked and kind of looks like a WiFi logo.
With this done, you’ll notice that on the track itself, the same button with the logo also glows orange, which is the second way you can listen to your track.
With this done should now hear a sound when you play your guitar. Check your guitar volume and interface gain knob/output volume if you’re having problems here.
4. Levels

Next, we need to set the proper level for recording. This is quite difficult to do in GarageBand because you only get a colored meter without any numbers to tell you how much signal is being input.
We want to aim for somewhere between -12dB and -6dB for a signal that’s strong, but has room for mixing.
To do this, you’ll need to adjust the gain level on your particular interface. Usually this is a knob somewhere near where you plug the guitar in, but it varies from manufacturer to manufacturer. If you’re unsure, check out the manual for your interface online.
Most audio interfaces come with companion software for setting your levels. In my example, I’m using UAD Console, but interfaces from the likes of Focusrite, Universal Audio, SSL, and many others come with their own software.
To test the level, you should play the loudest part of your song, and make sure the meter hovers somewhere between -12 and -6dB.
Depending on the part you’re playing, it might be spiking up and down a lot, which is fine. The important part is to make sure that the peak (the loudest) part of the playing doesn’t exceed that -6 figure.
If you don’t have this option, then the best measure is the input level itself in GarageBand. You’ll find this on the track itself, as well as in the top right of the app. Ideally, you want the peaks to be getting into the part of the bar where it turns from green to yellow. If you see red, dial back the gain on your interface, as you’ll be inputting too much signal.
5. Dial in your tone
Now that we’ve got a good level set, it’s time to dial in your tone. Taking your time here is key to ensuring a good end product. Experiment with the knobs and play with the different sounds until you have something you like. There are loads of great presets in GarageBand to get you started if you’re unsure.
6. Hit record

We’re almost ready to record! Before you do that, however, there’s one more task. We need to tune our guitar. If we’re going to be recording multiple takes and double-tracking rhythm guitars, they all need to be in tune with each other.
It’s good practice to get in the habit of tuning before every take, as there’s nothing worse than realizing you’ve spoiled a perfectly good take with a slightly out-of-tune G-string. Thankfully, there’s a great guitar tuner built into GarageBand.
If you’re recording with a metronome, now’s the time to set it up. The BPM and time signature are both located in the window at the top of GarageBand. You can also set your count-in time by hitting the record menu and selecting it from there.
The count-in is how many bars it counts before it starts recording. I like 2 bars personally because it gives me time to press record, feel the rhythm, and get ready to perform a take.
Once your guitar is in tune and your metronome is ready, press the red record button in the upper center-left of the screen and record your take.

If you’re happy, we can move on, but if not, just delete what you already did and start again. If you like, you can leave it recording and give yourself lots of attempts at playing it to get it right. Just bear in mind that the start and end points need to be bang on; otherwise, you’ll give yourself a headache when editing.
With that done, stack up as many tracks as you want. Just go to ‘Track’ in the top menu and select ‘New Track’ to add more. Make sure to put your ‘Playhead’, the white vertical line that runs down the screen, back to your start point each time.
In my example, I’ve recorded two of the same guitar parts and panned them hard left and right for a classic rock rhythm guitar sound. I really like the ‘Chicken Pickin’ preset for clean tones and the ‘Double Driven’ for crunchy sounds. There’s loads to choose from though.
Remember, you can change the settings even after you’ve recorded if you like, so if you don’t enjoy the way two tracks interact with one another, you can easily adjust the EQ, gain, or add additional effects after you’ve recorded them.

GarageBand also has a really useful built-in drummer function. I find it’s often more natural to play along to a drum kit than a metronome, so to add it in just click the ‘+’ in the top left above where your tracks are located, and select ‘Drummer’.
Once this is done, you can click the track and change the settings. That could be the drummer themselves, there are different ones for different styles, or the amount of hi-hat, kick and snare, swing, and more fills. There’s also an XY pad to change up the feel of the drums and how hard they’re hit.
To add more drum tracks, you can hit the yellow ‘+’ button that appears when you hover at the end of the region. If you’re leaving a gap, just right-click in the empty space on your track and hit ‘Create Drummer Region’.
If you’d like more control over this, a cheap MIDI keyboard like the Akai MPK Mini IV is a worthwhile purchase. You could use this to add in bass, synths, pianos, strings, and loads of other layers. It also has drum pads so you can build your own beats rather than relying on the built-in drummer.
Exporting

Once you’re happy, it’s time to ‘bounce’ the track from GarageBand. Hit ‘Share’ in the top menu and choose ‘Export Song to Disk…’
Here you can name your track and choose the file type. If you want the best quality and compatibility, I’d recommend going for ‘WAVE’ (aka WAV) and choosing the ‘Uncompressed 24-bit’ option.
If you want to send your track via email, MP3 offers a smaller file size, but it’s not as good quality as a WAVE file.
Before you export, just make sure you know where it’s exporting to so you can find it when you’re done!
Troubleshooting
I don’t see my audio interface listed in GarageBand?
The best course of action here is to exit GarageBand completely, and then unplug your interface and plug it back in again. Check your sound settings in the appropriate MacOS menu to see if your interface is listed here and select it if necessary. If it’s not showing here, you may have a deeper problem like a broken cable or broken interface.
Why is there a delay between when I play and hearing the sound in my headphones/speakers?
If you’re getting a delay, then you might have an issue with latency or buffer settings. GarageBand doesn’t have settings to change this, as it does it automatically, so there are a few things you could try to solve this problem.
Avoid things like wireless headphones and plugging your interface into USB hubs. Another simple thing is to use the direct monitoring on your interface so you can listen to the direct signal.
Make sure other apps on your Mac are closed to free up processing power, and if you’re still getting a delay after all this, I would try disabling the plugins and just recording your guitar as is. You can quickly add the plugins back in later down the line to get the sound you want.
Why is there a buzzing sound when I stop playing my guitar?
Recording in front of the computer can cause pickups to hum, especially if they’re single coils. I get this a lot in my home studio, and the best way to get rid of it is to turn the guitar away from the computer screen. Most of the time this will do the job. All of the amp sims in GarageBand also have a noise gate, so you can use that to clean up the audio, too.
If it’s still bad even when your guitar is turned away, there could be something else causing it. Crossing power cables with instrument cables, monitors, and the myriad electronic devices in the modern home can all cause hum. The best way to troubleshoot this is to unplug everything apart from those core items you need to find out what might be causing it.